Hello dear Amigurumi Knitting Lovers,Today we share a free amigurumi crochet pattern for you.
As you know, we share new amigurumi free patterns every day. master crochets, amigurumi gazelles, amigurumi bears, amigurumi pola, amigurumi pandas, amigurumi penguins, amigurumi giraffes, amigurumi lama, amigurumi pigs, amigurumi rabbit, amigurumi clowns, amigurumi dolls, amigurumi unicorn, amigurumi elephants, amigurumi unicorn , amigurumi hippos, amigurumi monkeys, amigurumi cats, amigurumi dogs and more…
Don’t forget to subscribe to receive notifications of our new free recipes.
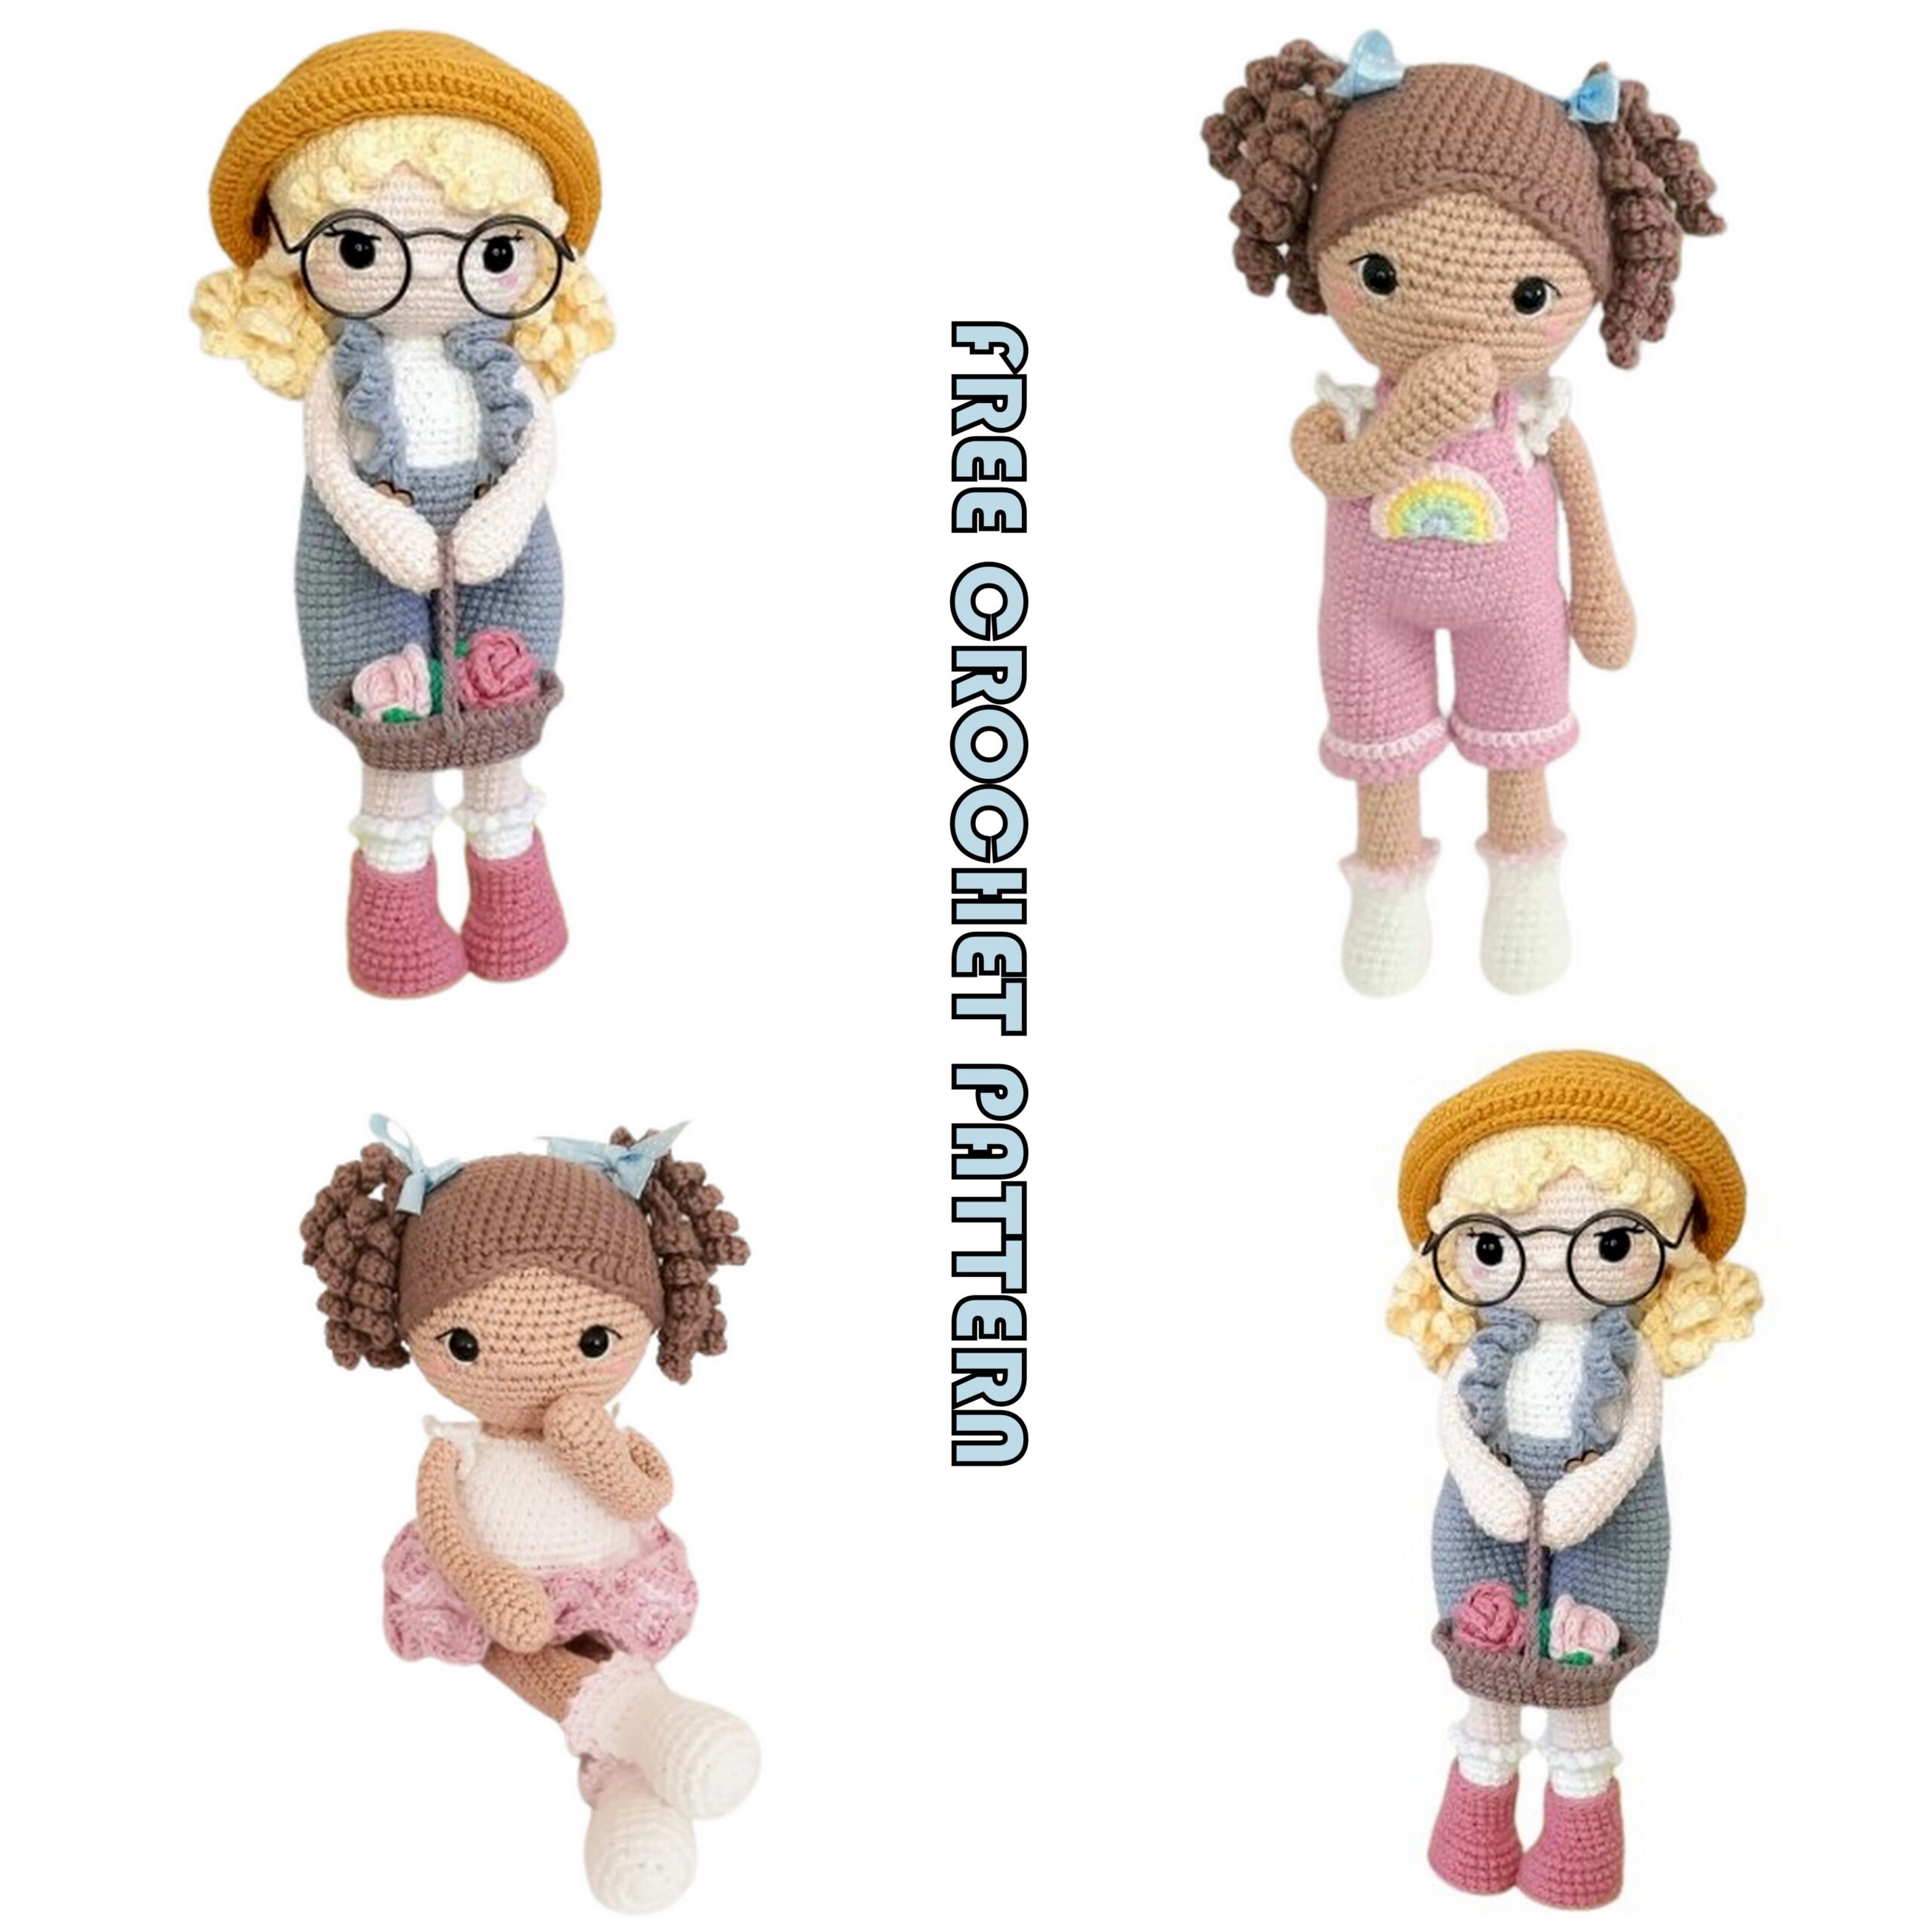
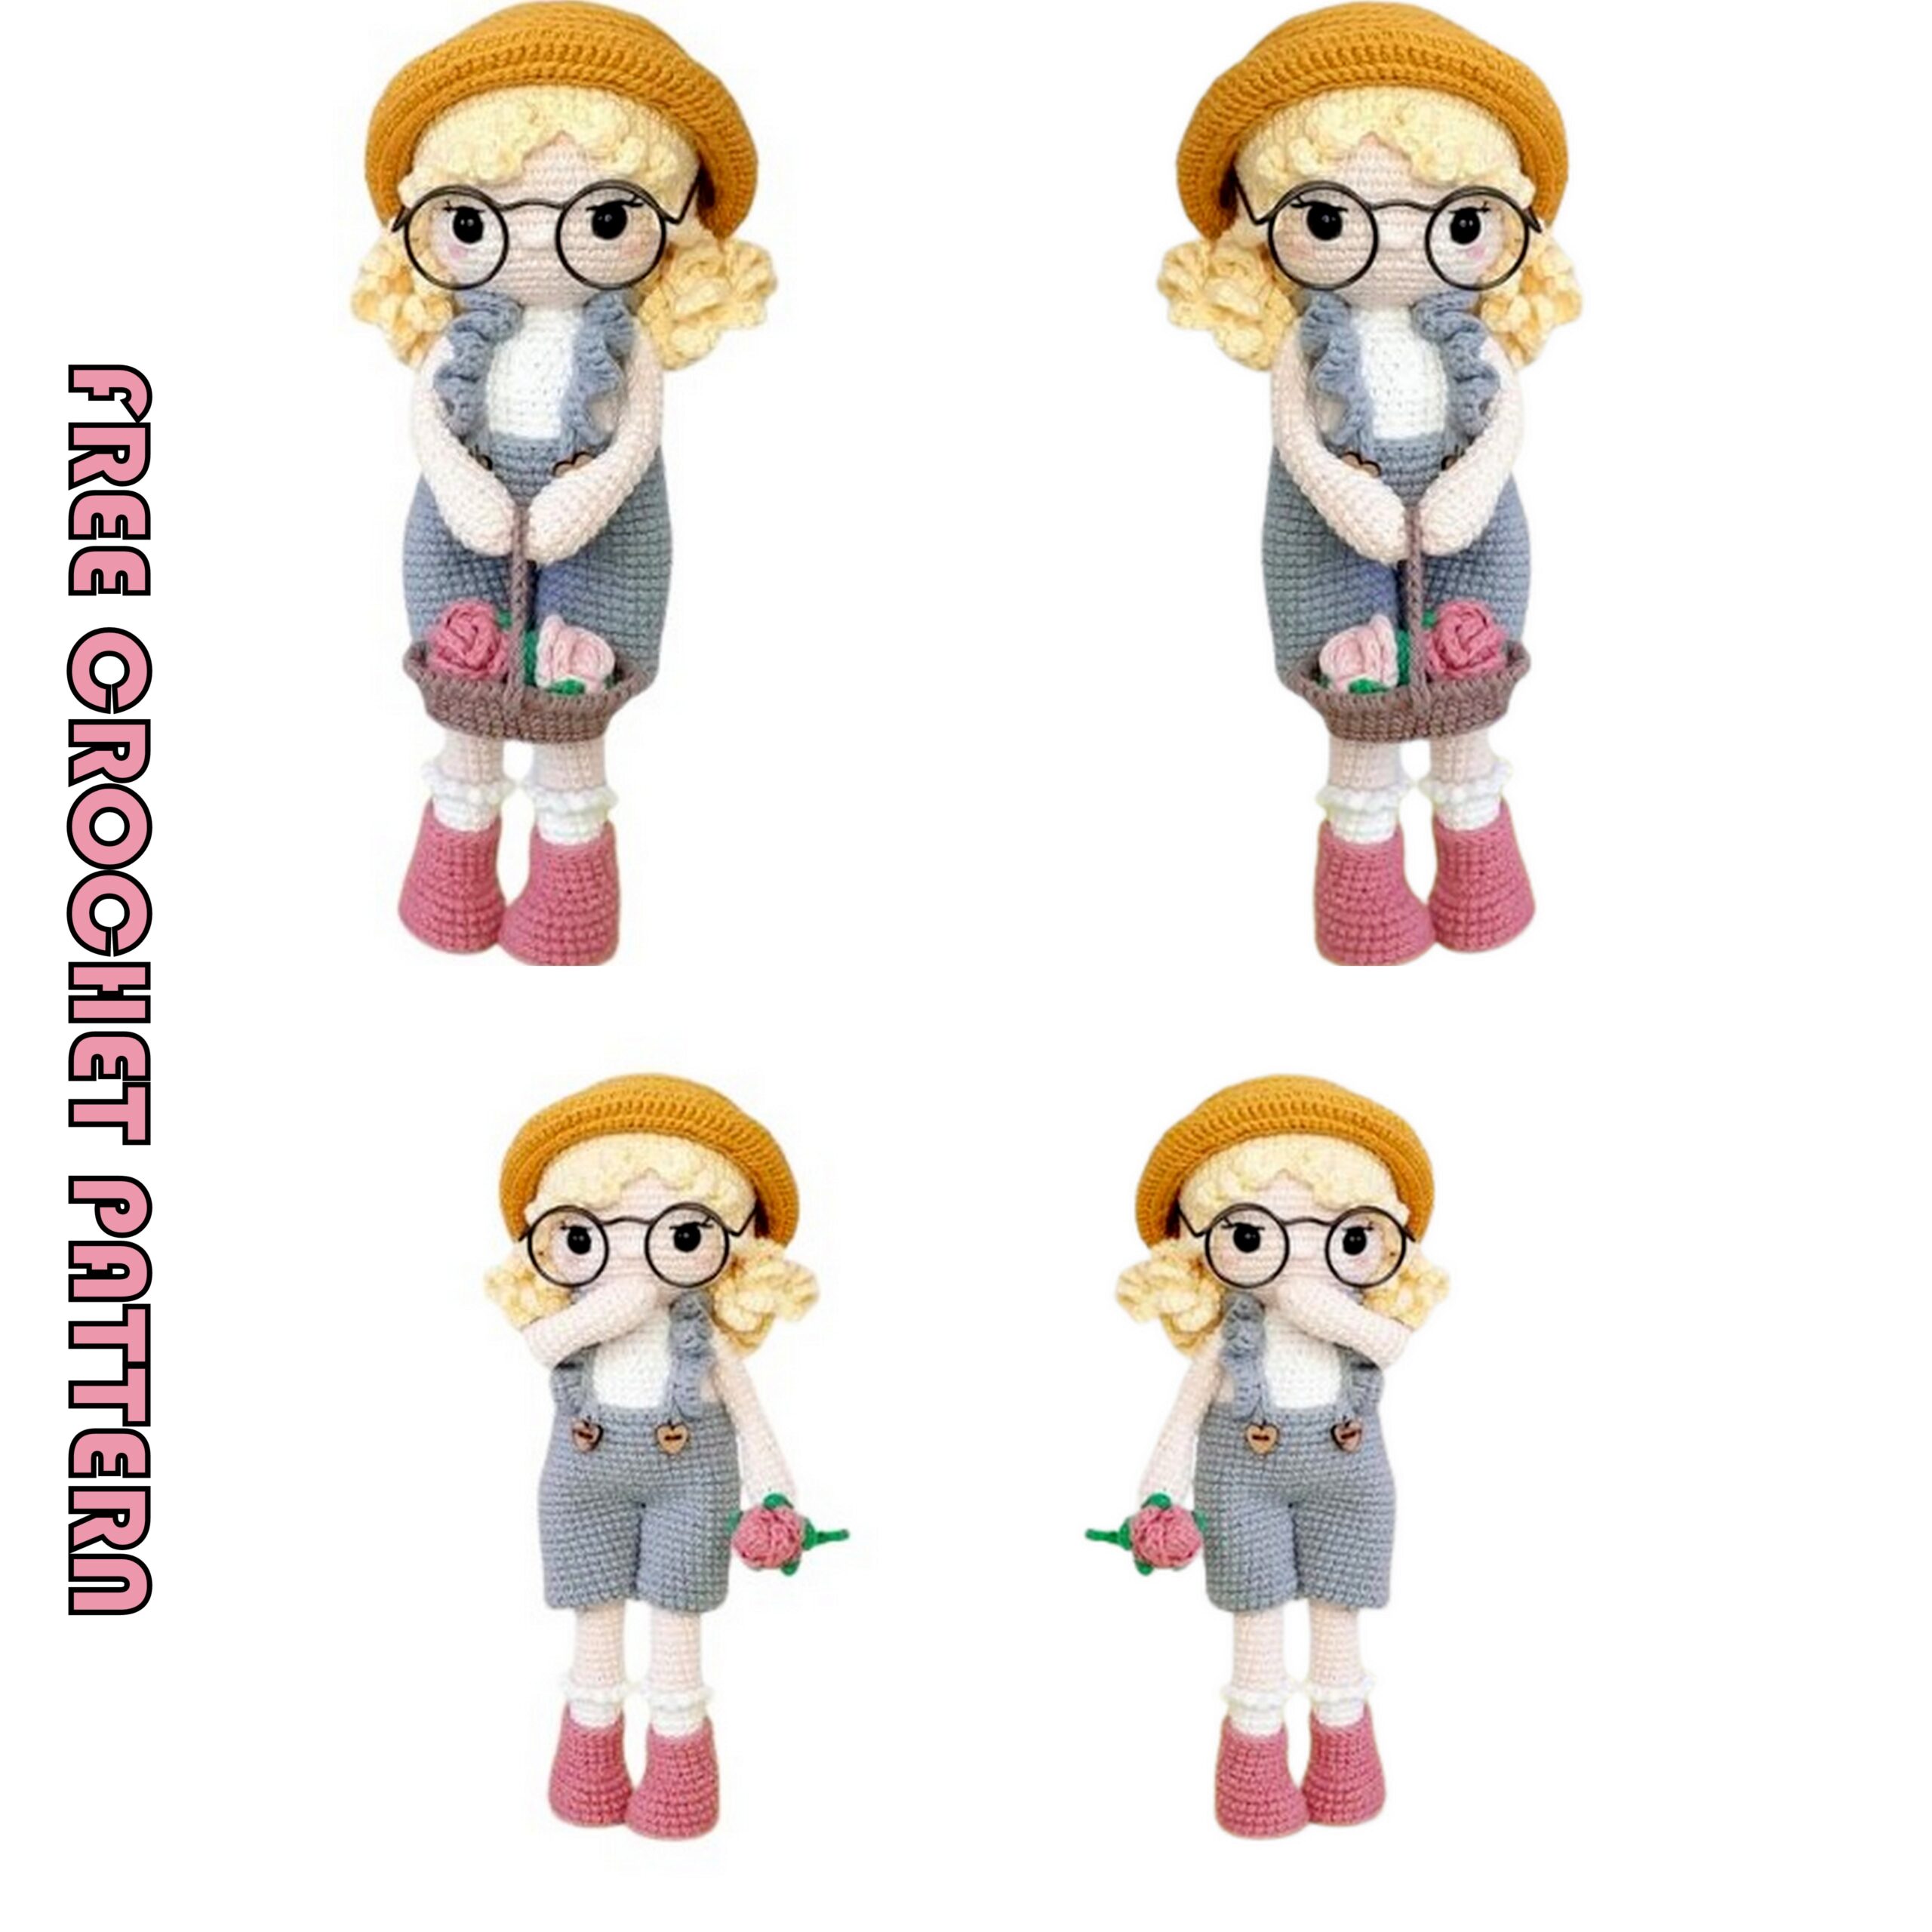
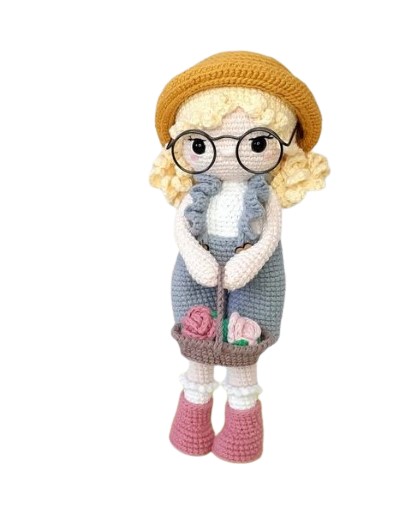
Today, the new daily crochet pattern Amigurumi Kimberly Doll Free Crochet Pattern, I want to give you some information about this pattern;
MATERIALS
YARN
022 Powder – Body X 2
001 White – Socks & Top X 1
010 Smokey Rose – Boots & Flower X 1
005 Vanilla – Hair X 1
064 Mustard – Hat X 1
038 Patina – Overalls X 1
044 Grass Green – Leaves X 1
011 Pink – Flower & Cheeks X 1
073 Wood – Trug (basket) X 1
OTHER MATERIALS
Hook size 2.25mm & 2.5mm
Black embroidery thread
9mm Safety eyes x 1 pair
10mm buttons x 1 pair
Doll glasses 63mm (optional)
Soft toy filling
Stitch markers / round headed pins / yarn needle / scissors
Fabric glue
ABBREVIATIONS – GENERAL GUIDE
mr – magic ring
st / sts – stitch / stitches
sl st – slip stitch
ch – chain
sc – single crochet
inc – single crochet increase
hdc – half double crochet
hdc inc – half double crochet increase
dc – double crochet
BLO – back loop only
FLO – front loop only
dec – invisible decrease (dec 2 sts together FLO)
tsc – twisted single crochet
rnd – round
F/O – fasten off
[…] * … – repeat instruction in bracket …
times
(…) – total number of sts in round / row
PATTERN TERMINOLOGY
This pattern is written in US terminology
FINISHED SIZE
Approximately 25cm in height using the recommended materials & hook size.
NOTES
Work in continuous rounds unless otherwise stated in the pattern.
Colour changes are made in the last step of the last sc of the round unless otherwise stated.
I have used the ‘x’ stitch to create my Kimberly (yarn under technique).
Using different materials and hook size to what is recommended may alter the final appearance of your doll.
If a different size hook and yarn is used, consider adjusting the size of the safety eyes & buttons accordingly.
The glasses I have used for my doll were purchased from Etsy and measure 63mm wide at the front.
You will need 2 hook sizes to make the boots only. The 2.25mm is used throughout with the 2.5mm used on the
final sl st round only
SKILL LEVEL
Intermediate
BOOTS – MAKE 2
Using ‘Smokey Rose’, ch 4, starting in the 2nd ch from the hook
Rnd 1: 2 sc, 3 sc in same st, (working on the other side of the ch) 1 sc, inc (8)
Rnd 2: inc, 1 sc, [inc] x 3, 1 sc, [inc] x 2 (14)
Rnd 3: 1 sc, inc, 1 sc, [1 sc, inc] x 3, 1 sc, [1 sc, inc] x 2 (20)
Rnd 4: 2 sc, inc, 1 sc, [2 sc, inc] x 3, 1 sc, [2 sc, inc] x 2 (26)
Rnd 5: FLO 26 sc (26)
For the next round we will work in the BLO of rnds 4 & 5 (Pic. 1, 2 & 3).
Rnd 6: BLO of rnd 4 & 5, 26 sc (26)

Rnd 7: For the 1st sc ONLY, work it into the BLO of rnd 6 (Pic. 4), the remaining 25 sc are worked through both loops of
each st (26)
Rnd 8 & 9 (2 rnds): 26 sc (26)

Before moving onto the next rnd, ensure you start the rnd at the back of the boot (Pic. 5). Adjust the number of sc in rnd 9
accordingly.
Rnd 10: 8 sc, [dec] x 5, 8 sc (21)
Rnd 11: 6 sc, [1 sc, dec] x 3, 6 sc (18)
Rnd 12 – 14 (3 rnds): 18 sc (18)
For the final rnd, change your hook size from 2.25mm to 2.5mm (or a hook size up from what you are using), this will reduce the
tightness that the sl st creates around the edge of the boot (Pic. 6 & 7).
Rnd 15: 18 sl st (18)
F/O and make an invisible stitch to finish, weave in the end. Lightly stuff the front of the boot only (to keep it’s shape)

ARMS – MAKE 2
Start with ‘Powder’
Rnd 1: 6 sc in mr (6)
Rnd 2: [1 sc, inc] x 3 (9)
Rnd 3: [2 sc, inc] x 3 (12)
Rnd 4 – 7 (4 rnds): 12 sc (12)
Rnd 8: [2 sc, dec] x 3 (9)
Stuff the hands only
Rnd 9 – 20 (12 rnds): 9 sc (9)
Change to ‘White’
Rnd 21 – 24 (4 rnds): 9 sc (9)
Before closing the arms, ensure the colour join is on the inside and adjust the number of sc accordingly if required.
Flatten the opening and sc in the next 4 sts through both layers to close. F/O and weave in the tail (the arms will be
attached as we work the body).

BODY
The legs, torso and head are made as one piece, with the arms attached as we work the torso.
We will start by making the legs.
Start with ‘White’
LEG 1
Rnd 1: 6 sc in mr (6)
Rnd 2: [inc] x 6 (12)
Rnd 3: [5 sc, inc] x 2 (14)
Rnds 4 – 14 (11 rnds): 14 sc (14)
Change to ‘Powder’
Do not F/O the white, bring the yarn strand forward before working the next rnd (this will be used later to edge the
sock) (Pic. 11).

Rnd 15: BLO 14 sc (14)
Start stuffing the leg. To ensure you are not over stuffing, try on the
boot as you work / stuff to make sure it fits snuggly.
Continue to stuff the leg as you go and stop at rnd 32.

Rnd 16 – 36 (21 rnds): 14 sc (14)
Before closing the round, make sure the join for the sock is lined up with the starting point to close the leg (Pic. 13). You
may need to make additional scs to get to the correct position (I made an extra 4 sc). This is to ensure that the colour join
sits on the inside of the dolls legs when finished

To close the leg, flatten the opening and sc in the next 7 sts through both layers. F/O and weave in the tail
SOCK EDGE
Using the white yarn we left attached earlier, turn you work upside down and pull up a loop in the last FLO of round 14
(Pic. 16).
Rnd 1: [Ch 2, slst back into base st, sl st into next st] x 13
On the last st, ch 2, sl st back into the base st and F/O. Make an invisible st into the FLO you started on (Pic. 17), secure
and weave in tail.

LEG 2
Repeat the instructions for ‘leg 1’ up to rnd 36 and add the sock edge. Then
follow the below.
The closing of the 2nd leg needs to start on the opposite side to the sock join
to ensure the join is on the inside of the leg (Pic. 19). Adjust the number of scs
to get to the correct position (I made 3 scs less in rnd 36).
On the last step of the last sc when closing the 2nd leg, change the colour to ‘White’.
Before connecting the legs, ensure the sock colour joins are sitting on the inside of the legs.
Ch 4 (weave in the tail ends of the leg and white yarn to secure the colour join).
We will now join the legs and make the torso. For rnd 37, we will work in the FLO, BLO and chs.
Rnd 37: 7 sc into the FLO of the closing rnd of ‘leg 1’, turn, 7 sc in BLO, 4 sc in ch, 7 sc in BLO of ‘leg 2’, turn, 7 sc in FLO, 4 sc
in ch (36)

Rnd 38: 36 sc (36)
Rnd 39: [11 sc, inc] x 3 ( 39)
Rnd 40: 39 sc (39)
Rnd 41: [12 sc, inc] x 3 (42)
Rnd 42 – 49 (8 rnds): 42 sc (42)
Rnd 50: [5 sc, dec] x 6 (36)
Rnd 51 – 53 (3 rnds): 36 sc (36)
Rnd 54: [4 sc, dec] x 6 (30)
Rnd 55: 30 sc (30)
Rnd 56: [3 sc, dec] x 6 (24)
We will now attach the arms in rnd 57 with 24 sc. Please ensure when attaching the arms that you have the colour join
sitting on the inside.

We will now make the final rounds of the torso before moving on to the head.
Rnd 58: [2 sc, dec] x 6 (18)
Rnd 59: [4 sc, dec] x 3 (15)
Change to ‘Powder’ and finish stuffing the torso.
HEAD
Rnd 60: 15 sc (15)
Rnd 61: [inc] x 15 (30)
Rnd 62: 2 sc, inc, [4 sc, inc] x 5, 2 sc (36)
Rnd 63: [5 sc, inc] x 6 (42)
Rnd 64: 3 sc, inc, [6 sc, inc] x 5, 3 sc (48)
Rnd 65: [7 sc, inc] x 6 (54)
Rnd 66: 4 sc, inc, [8 sc, inc] x 5, 4 sc (60)
Rnd 67 – 79 (13 rnds): 60 sc (60)
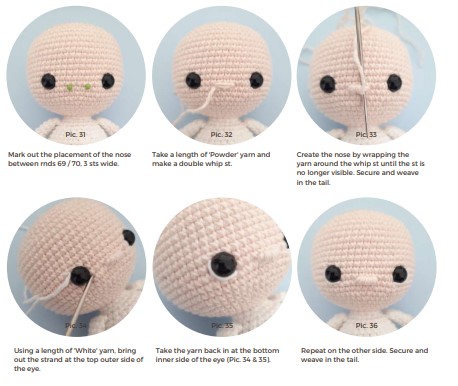
Insert 9mm safety eyes between rnds 70 / 71, 11 sts apart
Rnd 80: 4 sc, dec, [8 sc, dec] x 5, 4 sc (54)
Rnd 81: [7 sc, dec] x 6 (48)
Rnd 82: 3 sc, dec, [6 sc, dec] x 5, 3 sc (42)
Rnd 83: [5 sc, dec] x 6 (36)
Rnd 84: 2 sc, dec, [4 sc, dec] x 5, 2 sc (30)
Rnd 85: [3 sc, dec] x 6 (24)
Stuff the neck and head firmly, and continue to stuff until the final rnd.
Rnd 86: 1 sc, dec, [2 sc, dec] x 5, 1 sc (18)
Rnd 87: [1 sc, dec] x 6 (12)
Rnd 88: [dec] x 6 (6)
Pg. 8
F/O and weave the yarn tail through each FLO of the last round. Gently pull the tail to close the opening and weave it in.


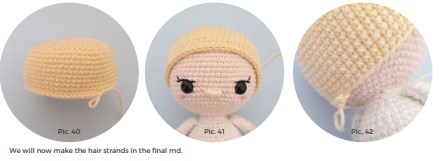
HAIR
The hair is made up of a cap, with the hair strands worked in the final rnd. Use ‘Vanilla’
Rnd 1: 6 sc in mr (6)
Rnd 2: [inc] x 6 (12)
Rnd 3: [1 sc, inc] x 6 (18)
Rnd 4: 1 sc, inc, [2 sc, inc] x 5, 1 sc (24)
Rnd 5: [3 sc, inc] x 6 (30)
Rnd 6: 2 sc, inc, [4 sc, inc] x 5, 2 sc (36)
Rnd 7: [5 sc, inc] x 6 (42)
Rnd 8: 3 sc, inc, [6 sc, inc] x 5, 3 sc (48)
Rnd 9: [7 sc, inc] x 6 (54)
Rnd 10: 4 sc, inc, [8 sc, inc] x 5, 4 sc (60)
Rnd 11 – 20 (10 rnds): 60 sc (60
Before working the final rnd, place the hair cap on the head and check if it is a suitable fit. The haircap should sit 8 rnds
above the nose at the front, and 3 rnds up from the neckline at the back. If your cap is too big or small, adjust the
number of rnds accordingly.
Rnd 21:
PONYTAIL 1
ch 37, starting in the 2nd ch from the hook, [inc] x 36, sl st into next st of the cap.
Repeat * to * 2 more times to make 3 strands in total for the first pony tail. Sc in the next 8 sts of the cap.
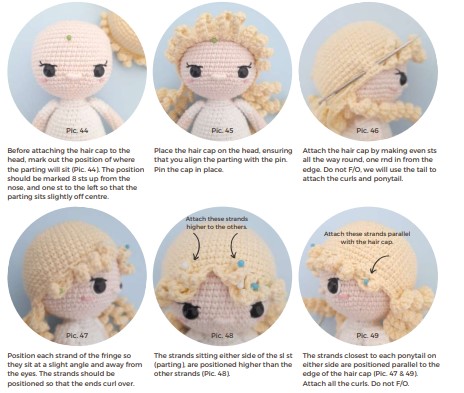
FRINGE
The fringe is made up of 5 strands in the first section, 6 strands in the 2nd section, divided with a sl st between them.
ch 8, starting in the 2nd ch from the hook, [sc] x 7, skip next st and sl st in next st.
Repeat * to * 4 more times to make a total of 5 strands for the 1st section of the fringe.
Sl st into next st (this marks the parting of the fringe).
ch 8, starting in the 2nd ch from the hook, [sc] x 7, skip next st and sl st into next st.
Repeat * to * 5 more times. On the last strand, replace the final sl st with a sc.
This will give you 6 strands for the 2nd section of the fringe. Sc in the next 8 sts.
PONYTAIL 2
Repeat * to * from ‘Ponytail 1’ to make 3 strands.
Once you have 3 strands for ‘Ponytail 2’, make 15 sc to complete rnd 21.
F/O and make an invisible st to finish. Leave a long enough tail
to attach the hair cap, fringe and ponytail strands.
ATTACHING THE HAIR

HAT
The hat is worked in the BLO & FLO throughout, with the last rnd
worked through both loops.
Using ‘Mustard’
Rnd 1: 6 sc in mr (6)
Rnd 2: BLO [inc] x 6 (12)
Rnd 3: BLO [1 sc, inc] x 6 (18)
Rnd 4: BLO 1 sc, inc, [2 sc , inc] x 5, 1 sc (24)
Rnd 5: BLO [3 sc, inc] x 6 (30)
Rnd 6: BLO 2 sc, inc, [4 sc, inc] x 5, 2 sc (36)
Rnd 7: BLO [5 sc, inc] x 6 (42)
Rnd 8: BLO 3 sc, inc [6 sc, inc] x 5, 3 sc (48)
Rnd 9: BLO [7 sc, inc] x 6 (54)
Rnd 10: BLO 4 sc, inc [8 sc, inc] x 5, 4 sc (60)
Rnd 11: BLO [19 sc, inc] x 3 (63)
Rnd 12 – 18 (7 rnds): BLO 63 sc (63)
Before working the rim of the hat, check the hat is a suitable fit. If it is
to long or short, adjust the number of rnds accordingly.
In the next rnds, we will work in the FLO to create the rim of the hat,
with the last rnd worked through both loops.
Rnd 19: FLO [1 sc, inc] x 31, 1 sc (94)
Rnd 20 – 22 (3 rnds): FLO 94 sc (94)
Rnd 21: 94 sc (through both loops) (94)
F/O and make an invisible st to finish, weave in tail.

OVERALLS
LEG ONE
Using ‘Patina’, ch 26 and ensuring your chain is not twisted, sl st into the first ch to create a circle (sl st counts as a stitch).
Rnd 1 – 9 (9 rnds): 26 sc (26)
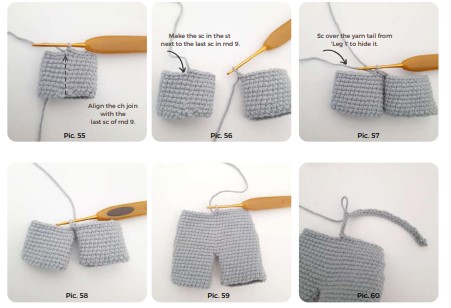
Before you F/O, make extra scs so that the join from the starting ch and the last sc of rnd 9 are aligned. This will ensure
that the join is sitting on the inside of the leg (Pic. 55).
F/O and make an invisible stitch, weave in the starting tail.
Pic. 55 Pic. 56 Pic. 57
LEG TWO
Repeat ‘LEG ONE’ instructions, ensuring the starting join and last sc of rnd 9 are aligned, do not F/O. At the end of round
9, ch 1 and make 1 sc into the st after the last sc of rnd 9 of the first leg to join (Pic. 56). In rnd 10 sc over the tail from ‘LEG
ONE’ to conceal it.
Rnd 10: sc in the next 25 sts, 1 sc into the ch, 26 sc around the 2nd leg and 1 sc into the ch (54) (Pic. 57)
Rnd 11 – 14 (4 rnds): 54 sc (54)
Rnd 15: dec, 12 sc, dec, 11 sc, dec, 11 sc, dec, 12 sc (50)
Rnd 16 – 18 (3 rnds): 50 sc (50)
Rnd 19: 11 sc, dec, 24 sc, dec, 11 sc (48)
Rnd 20 – 21 (2 rnds): 48 sc (48)
Rnd 22: 1 sc, dec, 9 sc, dec, 11 sc, dec, 9 sc, dec, 10 sc (44)
Before working the suspenders, we need to ensure we are starting at the back centre. Flatten your work and adjust the scs
accordingly so you are at the central point at the back (Pic. 59)
SUSPENDERS
We will now make the suspenders using chs and sl sts, the frills are worked separately. Make the chs and sl sts slightly
looser or consider using a hook size up from what you are currently using.
Ch 32, skip 6 chs and sl st in the next 22 chs (Pic. 61), ch 28, skip 6 chs and sl st in the next 22 chs, sl st in the remaining 4
chs, sl st into the the base st (Pic. 62).
F/O and make an invisible st to finish, weave in the tail.

SUSPENDER FRILL EGDES
The frills are worked into each strap with the centre bar left unworked.
FRILL ONE
Using ‘Patina’, and starting on the right strap (from the back), pull up a loop in the 5th st up from the base (Pic. 64).
Row 1: Ch 2, and then make 2 hdc in the same st, [3 hdc] in each of the next 20 sts (63), ch 1 and turn.
Row 2: 63 sc (63)
F/O and weave in the tails.

FRILL TWO
For ‘frill two’, repeat frill one, but pull up a loop in the 1st st after the button hole
on the left outer side (Pic. 62).
Row 1: Ch 2, and then make 2 hdc in the same st, [3 hdc] in each of the next 20
sts (63), ch 1 and turn.
Row 2: 63 sc (63)
F/O and weave in the tails.
Attach 2 x 10mm buttons to the front of the pants, 8 sts apart and 3 sts down
from the top edge.
TRUG & FLOWERS
We will now make the trug and flowers, starting with the trug (basket).
TRUG
Using ‘Wood’, ch 10 and starting in the 2nd ch from the hook
Rnd 1: 8 sc, 3 sc in same st, (working on the other side of the ch) 7 sc, inc (20)
Rnd 2: inc, 7 sc, [inc] x 3, 7 sc, [inc] x 2 (26)
Rnd 3: 1 sc, inc, 7 sc, [sc, inc] x 3, 7 sc, [sc, inc] x 2 (32)
Rnd 4: FLO 32 sc (32)
For the next round we will work in the BLO of rnds 3 & 4 (Pic. 68 & 69).
Rnd 5: BLO of rnds 3 & 4, 32 sc (32)

Work the 1st inc of rnd 6 into the BLO (Pic. 70), work the remaining sts through both loops.
Rnd 6: Inc, 11 sc, inc, 3 sc, inc, 11 sc, inc, 3 sc (36)
Rnd 7: 1 sc, inc, 12 sc, inc, 4 sc, inc, 12 sc, inc, 3 sc (40)
Rnd 8: 2 sc, inc, 13 sc, inc, 5 sc, inc, 13 sc, inc, 3sc (44). Make 1 additional sc at the end of rnd 8.
For the final rnd we will edge the trug with a ‘twisted sc’ (tsc) as instructed in the next 3 steps.
Rnd 9: 44 tsc (44).
F/O and make an invisible st to finish, weave in the tail.

TRUG HANDLE
We will now make the handle for the trug.


FLOWERS
The flower is made in 2 parts, and joined together using fabric glue.
We will make the leaves and stem first and then the flower head.


YOUR DOLL IS READY!